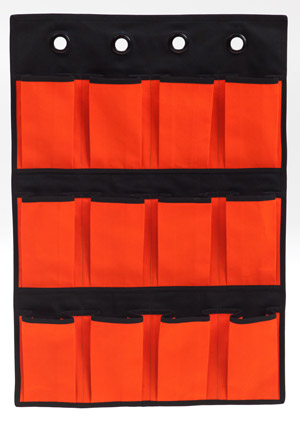
Hanging Shoe Organizer
Project Information
by Carol R. Zentgraf Design & Editorial Services
Organize your shoes and add a decorative accent to a closet door at the same time when you make a hanging organizer. This one holds six pairs of shoes, but you can easily adjust the instructions to hold more or fewer pairs.
Size: 22" x 32"
Materials:
- 1 yard each of four colors of Black and Orange Canvas Duck
- Four 2" Dritz Home snap-together black curtain grommets
- Two packages of double-fold black bias tape
- White chalk pencil
- Warm Company Steam a Seam 2 fusible web tape
Instructions:
- From the black canvas, cut one 22" x 32" rectangle for the caddy. From the orange canvas, cut three 8" x 43" strips for the pockets.
- Press each orange canvas strip in half lengthwise with wrong sides together. Baste the long raw edges together. Wrap bias tape over the folded edge of each strip and edgestitch in place.
- Using the chalk marker, mark the top edge of the caddy rectangle at 5 1/2" intervals. Repeat for the bottom edge. Draw lines connecting the marks at the top and bottom; these will be the pocket stitching marks.
- Apply fusible web tape to the inside long raw edge and both short edges of each pocket strip; do not remove the paper backing. Fold each pocket strip crosswise in fourths and mark the top and bottom of each fold with a pin.
- To add the bottom pocket strip, remove the paper backing from the fusible web. Position the pocket strip along the bottom edge of the caddy, aligning the side and bottom edges of the pocket and caddy. Fuse the pocket side edges in place. Align the pocket pin marks with the stitching lines on the caddy and pin. Make and press a pleat on each side of each pocket to make the pockets fit the caddy. Fuse the bottom edge in place. Stitch the pockets to the caddy at each stitching line.
- Using the chalk pencil, draw a line across the caddy 1 1/2" above the bottom pocket to mark the lower edge of the middle pocket. Aligning the bottom of a pocket strip with the line, repeat Step 5 to sew the middle pocket in place. Repeat to add the top pocket.
- Wrap binding around the edges of the caddy and stitch in place.
- Follow the manufacturer's instructions to evenly space and apply the grommets across the top of the caddy. Hang the caddy with hooks or nails through the grommets.
Sources:
- Dritz Home grommets, www.dritz.com
- Steam a Seam 2 fusible web tape, www.warmcompany.com
For diagrams and patterns please download the PDF instructions.
PLEASE NOTE: We try to accurately represent the product colors on our
website, but internet colors may differ from actual fabric color. Please
request a sample to check actual color!