Halloween Wall Hanging
Project Information
by Carol R. Zentgraf Design & Editorial Services
Welcome Halloween with an easy-to-make appliquéd wall hanging with a pieced border.
Size: 24 1/2" x 24 1/2"
Materials
- 5/8 yard of Quilted Osnaburg fabric
- 1 1/4 yards of Green Wild Stripes Ticking
- 1/2 yard of Orange Flannel
- 1/4 yard each of Green and Black Flannel
- Scraps of Brown Flannel
- Fairfield Corp. cotton batting
- Warm Company Steam a Seam 2 fusible web
Instructions:
Note: Use a 1/4" seam allowance and sew seams with right sides together.
- From the green ticking, cut one 24 1/2" x 24 1/2" square for the backing. For the outer borders, cut six 2 1/2" x 15" strips with the stripes running vertically and six 2 1/2" x 15" strips with the stripes running horizontally. Cut and piece 2 1/2"-wide bias strips to 100" long for the binding.
- From the quilted osnaburg fabric, cut one 18 1/2" x 18 1/2" square.
- From the black flannel fabric, cut two 1 1/2" x 18 1/2" and two 1 1/2" x 20 1/2" strips for the inner borders.
- From the batting, cut one 24 1/2" x 24 1/2" square.
- Following the manufacturer's instructions, trace the pumpkins, stems, leaves and facial features onto the fusible web, leaving at least 1" between patterns. Cut the pieces out 1/2" from the traced lines. Fuse each piece to the wrong side of the appropriate fabric, then cut out along the traced lines.
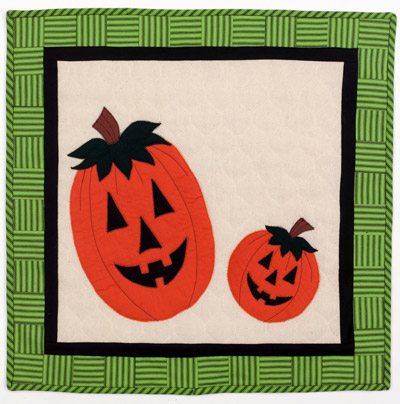
- Referring to the photo, position the applique pieces on the osnaburg square and fuse in place. Stitch across the edges of each applique piece with a zigzag stitch. Straight stitch accent lines on the pumpkins as shown.
- Sew the 18 1/2"-long inner border strips to the side edges of the osnaburg square. Sew the remaining inner border strips to the top and bottom edges.
- To make the outer border, sew the long edges of the 15"-long strips together, alternating strips with vertical and horizontal strips. Press the seams to one side. Cut four 2 1/2"-wide strips across the pieced strips. Sew a strip to each side edge of the wallhanging, trimming the ends even with the top and bottom of the wallhanging; press the seams toward the outer border. Sew the remaining strips to the top and bottom of the wallhanging and press.
- Layer the ticking backing square wrong side up, the batting square and the pieced top right side up and baste the edges together.
- To bind the edge of the wallhanging, press the bias strip in half lengthwise with wrong sides together. Sew the folded binding to the front of the wallhanging, aligning raw edges. Wrap the folded edge to the back and press. Stitch in the ditch from the front, catching the folded edge of the binding in the stitching.
Sources:
- Fairfield Processing Corp. cotton batting, www.poly-fil.com
- Steam a Seam 2 fusible web, www.warmcompany.com
For diagrams and patterns please download the PDF instructions.
PLEASE NOTE: We try to accurately represent the product colors on our
website, but internet colors may differ from actual fabric color. Please
request a sample to check actual color!